Friday, December 13, 2013

The Best Chocolate Cake


I baked this cake this year and last year for my grandmothers birthday (which was actually a long time ago. Obviously it has taken me months to write about it) The first time I made it, it was for the group that goes to her house on Sunday. I can usually only go over the summer, so I use the family as an excuse to test out new recipes. She loved it so much, she requested I make another one for her birthday dinner that she has with her 6 sons a few days later. I made it again this year because, instead of a private dinner, she had a bowling party for everyone in the family, including the grandkids. I also made a batch of red velvet cupcakes to make sure we had enough for everyone. These two were easy to bake together because they both require buttermilk, which is great because who ever actually uses all of their buttermilk…

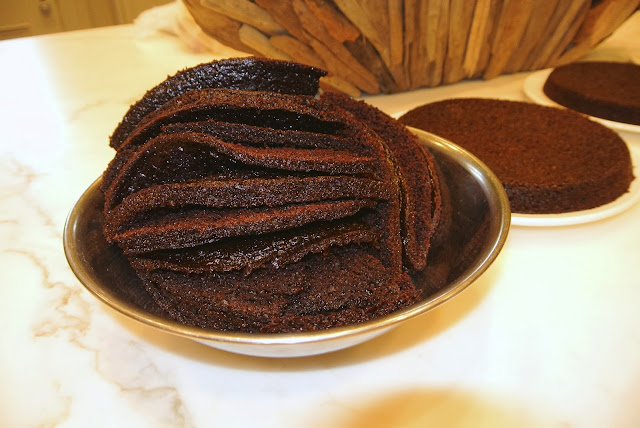
This cake is probably one of my favorite things that I have made. It's that good. It really is fool proof. For this cake I doubled the recipe and cut off the tops so it was tall and smooth. I probably ended up cutting off too much, so I had a mountain of cake tops left over. I saved those and made cake pops with the leftover pudding/cream cheese mixture instead of icing and they were delicious. If I was just making cake pops, I think the pudding-y filling would be a really nice, lighter change to the typical regular cream cheese or store bought icing many recipes call for. 


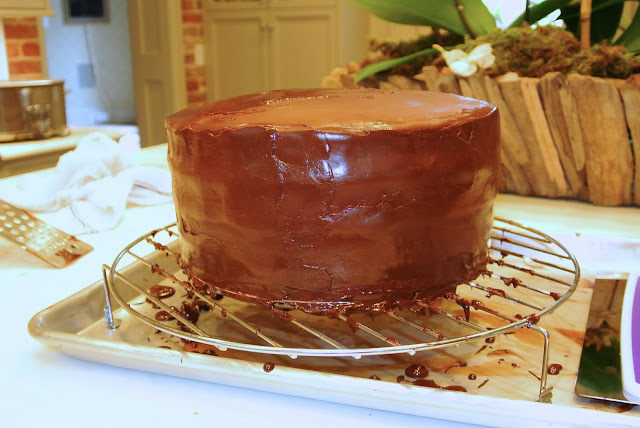
See how the side is not perfectly smooth? Make sure that the walls of your cake pans stick straight up. I leaded my lesson and will never use cake pans with even the slightest slant in them ever again...

The Cake 
For the cake, I use the famous Hershey's chocolate cake recipe. It's incredible and I will never use another one. There is no point. I've come across it on countless different blogs and they all say this is the one. It's incredible moist, light and tender. Everything a chocolate cake should be. Not to mention its super easy too.

1 ¾ cups all-purpose flour

2 cups sugar

¾ cup cocoa powder

2 tsp. baking soda

1 tsp. baking powder

1 tsp. salt

2 large eggs

½ cup vegetable oil

1 cup black strong coffee (I don’t drink coffee so I get mine from a coffee shop, usually the bar at whole foods)
1 cup buttermilk
1 tsp. vanilla extract

1. In a large bowl, mix together all of the dry ingredients.
Some recipes say to sift the dry ingredients, others say don't. I've done both and I don't really have a preference. I think I usually do just because, but it works either way. 

2. In a separate bowl, whisk all of the wet ingredients together.

3. This can actually be done by hand or with a mixer, pour the wet ingredients to the dry and mix until just incorporated. And that's it…

4. Pour into two 9-inch cake pans and bake at 350 for 28-30 minutes. I've also done them as cupcakes and they were amazing as well. I honestly can't remember how long I baked them for. Maybe 20 minutes? I'll have to do it again and get a more exact time…


The Filling
Ingredients 
1 package of room temperature cream cheese
1 package of vanilla pudding, prepared to the directions (aka with milk)
1 cup heavy whipping cream 
1 cup confectioners sugar 

  1. First mix the heavy whipping cream on high until stiff peaks form. Set aside
  2. In a separate bowl, mix together the prepared pudding and room temperature cream cheese.
  3. Add the confectioners sugar to the cream cheese and pudding mixture.
  4. Fold in scoops of the whipped cream until desired consistency is reached.
  5. Refrigerate for about an hour before using. 


Ganache 
I actually don't really use a recipe for ganache. I just use heavy cream or heavy whipping cream and heat it over a double boiler. Then I take all of the chocolate I have and mix it in once the milk is hot. I've used chips, bakers chocolate and chocolate disks - sometimes all together. Most recipes say 8 ounces bittersweet chocolate to 1 cup of heavy cream, but it's not imperative that you have a perfect ratio, in my opinion. You can also boil the cream regularly without a double boiler and then pour the hot cream over the chopped chocolate. Either way works in my opinion. So many times I've done it out of order and it always comes out great every time. I've even melted the chocolate first and then added the cream, which isn't a great way of doing it because it potentially not come out as smooth but sometimes I get side tracked in the kitchen and my instinct is to put chocolate over the double boiler and not the cream. As long as it doesn't burn (either the chocolate or the cream) it's probably going to work. I've also used sour cream when I didn't have heavy and it worked just as well. (In that case though, melt the chocolate first) 

***NOTE - made sure your cake pans are straight up on the sides. I used the pans at my dads house and they angle out of the sides. SO. ANNOYING. These sorts of pants shouldn't exist. This is why the sides of my cake aren't totally smooth. I could have carved it to be flush but I didn't want to risk really messing it up, and I thought I could put enough ganache so that it wouldn't be noticeable but it was regardless. 


uhhh THE BEST PART am I right?
I think the cake was a little too cold, but it allowed me to get a really thick layer of ganache, so no complaints!

Look how smooth that sucker is.

See how it is kind of rough on the side? After a certain point you have to stop fooling with it, otherwise the ganache sets and you lose that nice shine 
yeah that's right....


Happy (belated) Birthday, Mimi! 

Monday, November 11, 2013

Decorated Sugar Cookies for Breast Cancer Education and Awareness


October is national Breast Cancer Awareness and Education month, so my ZTA chapter, Eta Zeta, does a bunch of profit shares and hosts a big Think Pink event every year. At the event we have tables full of baked goods, we hand out ribbons and breast exam pamphlets, have a breast cancer survivor tell their story (amazing), and have games and live musical performances by the incredible acapella groups at Elon, Sweet Signatures and Rip Chord. I love events like these because they are the perfect opportunity for me to practice my sugar cookie decorating skills. It takes a ton of work, so I need a really good excuse to take over and ultimately destroy the kitchen, and pretty much any surface area in our living room for 2 days.

Breaking the process up into 2 days (if not 3) is the best and least exhausting way to go about making sugar cookies like these (especially when you have other things to do, like, I don't know, maybe go to CLASS for example...). Day 1 is for preparing, refrigerating, cutting out and baking the cookies. It's nice to have a system worked out with cutting out, baking and cooling, because I think it is best to only bake one sheet at a time. (In an ideal situation - preparing the dough can also be day 1, baking on day 2, decorating on day 3 - with day 4 being the day of the event) Baking and decorating also produce their own unique messes, so it's good to completely clean up, go to sleep and start fresh the next day. This also guarantees that the cookies will be completely cool and ready for decorating. The cookies also get softer overnight if you accidentally over bake some. My oven is complete crap, so every batch baked for a different amount of time. I had to watch them like a hawk - while simultaneously rolling and cutting out the next batch).

This time I think I did a really good job cleaning up as I go…Not perfect by any means, but it does make the process go significantly smoother. Most recipes also say the ENTIRE process of baking, cooling and decorating takes 5 hours. like WHAT? hoowwwww. like actually HOW? Maybe I just need more practice, but that is just absurd. There is NO WAY - no way you can decorate that many cookies in that amount of time.

Rolled Sugar Cookies 
I got the recipe here and followed the advice from the comments

Ingredients
1 ½ cups butter, room temperature
3 cups of sugar
4 eggs
5 cups all purpose flour
2 teaspoons baking powder
1 teaspoon salt
2 tsps vanilla

In a medium sized bowl, mix together the flour, baking powder and salt.
In a large together, cream together the butter and sugar until light and fluffy. Then add the eggs and vanilla.

In 3 increments, add the flour mixture to the large bowl, using a spatula (not the mixer).

Either cover the bowl with plastic wrap and refrigerate for at least 2 hours, or over night. You can also separate the dough into two balls or disks and wrap in plastic wrap. (It was hard digging out the hard dough from the bowl, so I prefer doing it this way and breaking off pieces at a time)

Preheat the oven to 400 degrees. Lightly flour your work space and rolling pin and roll out the dough to about ¼ to ½ inch thickness. Cut out shapes with a cookie cutter and place on a silpat or tin foil (I rotate between the two because I only have one silpat)


If your oven maintains a consistent temperature, bake for 6 to 8 minutes – making sure the edges don’t get too brown. A faint brown edge is ok, but maintaining a light tan color is preferable.  Cool completely.

For my decorating icing I use this recipe from Sweetopia, but I add a teaspoon or so of almond extract to tone down the strong flavor of the confectioners sugar. Also, in order to write words on the cookies without too much spreading (everything in turqoise), I put some icing on research and added an additional teaspoon of meringue powder. These were very cute, but the mouth feel wasn't the best because it was harder - so I wouldn't go overboard.


These little strawberries were my favorite! Strawberries are one of zeta's national symbols, so I thought it would be a cute way to tie together Breast Cancer Awareness and our sorority (well fraternity actually…). At first I was afraid not making them all red was a dumb decision, but I'm so glad I didn't. They were so small and popable, and surprisingly weren't hard to decorate either considering there were so many of them. I'll definitely be making these again!


Think Pink
me (and very little sleep) and MY LITTLE, Jessica (well one of my littles….) 
Everyone in our chapter brought one of their bras as decoration - SO CLEVER
Laura and her bedazzled black bra (costume purposes only, of course) 
The all girls acapella group at Elon, Sweet Signatures. They were amazing!
The cookies in action
I just loved these too much - Rice Krispy Boobs!


Monday, November 4, 2013

Salted Nutella Stuffed Browned Butter Chocolate Chip Cookies

Salted Nutella Stuffed Browned Butter Chocolate Chip Cookies Recipe and directions from Ambitious Kitchen, found here 

Ingredients
2 ¼ cup all-purpose flour
1 ¼ teaspoons baking soda
¼ teaspoon of salt
2 sticks (1 cup) unsalted butter (browned and set at room temperature)
1 ¼ cup packed dark brown sugar
¼ cup granulated sugar
1 large egg plus 1 egg yolk
1 ½ teaspoons vanilla extract
1 tablespoon plain Greek yogurt
¾ cup semi-sweet chocolate chips
½ cup milk chocolate chips
½ cup dark chocolate chips
1 jar of Nutella, chilled in refrigerator
Fleur de Sel or course sea salt for sprinkling

**Helpful links for how to brown butter found here and here. Make sure to let it get room temperature though. It doesn't specify in the original recipe but when I made browned butter cupcakes with the hot butter, they turned out incredibly dense. Cookies and cupcakes are very different, but I still didn't want to make the same mistake twice - so exercise caution.