Showing posts with label white chocolate. Show all posts

Sunday, January 12, 2014

Cookies and Cream Cookies


I know it's crazy, but Oreos just aren't my favorite. I've never really loved them, even when I was a kid. I'll eat them of course, but I don't bat an eyelash when I pass them in the grocery store or anything. I feel like i'm the only one, but I actually like the golden Oreos so much better. I also get beef for hating steak and preferring Royal Red shrimp over lobster. I know, it's a crime; especially in my family (although maybe not the royal red part). 

My roommate and best friend, i.e. Courtney, happens to love Oreos. When I came across this recipe, I knew that I had to make them (for both of our sakes).  Since I always prefer a hot, homemade chocolate chip-y cookie, I thought these would be the perfect compromise. I couldn't believe it, they were amazing. They also never got hard. Ever. I really don't think it's possible to over bake these because of the pudding, so they are pretty much foolproof; and any foolproof recipe is one that you keep forever - especially when you can say it's completely homemade. (in other words, a boxed cake mix is pretty much foolproof, but where are the bragging rights, youknowwhatimean?) 


The only annoying part about this recipe, at least for my sake, is that you have to buy or have Oreos on hand, and you don't use the entire package. Thus, I end up snacking on the Oreos, even though I don't really enjoy them; because you know, they're just…well there….and that easy to open package just makes them so accessible.... However, having a mother that freezes literally everything (shootout, Althea!), and who actually prefers frozen cookies to fresh, I know that Oreos can last forever in the freezer. And since you only use about half of the package, you can use those leftovers to make another batch in the future OR like a pie crust for a peanut butter pie or something….or cookies and cream ice cream (but with a chocolate base, because of course I don't like regular cookies and cream ice cream either…)

For these cookies, I used this recipe and this recipe; no idea where the original came from.

Cookies and Cream Cookies 
with crushed Oreos and white chocolate chips 

Ingredients 
1 cup (2 sticks) unsalted butter, room temperature 
½ cup brown sugar
½ cup granulated sugar 
1 3.4 oz. package instant vanilla pudding mix 
2 eggs
1 tsp. vanilla
2 ¼ cups all-purpose flour
1 tsp. salt
1 tsp. baking soda
One column of Oreos, crushed in a plastic bag, plus 5 crushed by hand for bigger pieces 

1 heaping cup of white chocolate chips

Note this cookie recipe follows a slightly different order than normal. But I promise, so as it says. Also, unlike most cookies that need to be refrigerated, these can be baked immediately. I also suggest letting the dough get more room temperature if you plan on refrigerating the dough before baking.

Directions 

1.   In a separate bowl, stir together the flour, salt and baking soda. Set aside.

2.   In a larger bowl, cream the butter and sugars until light and fluffy

3.   Add the pudding mix and blend until incorporated

4.   Add eggs one at a time, and then vanilla

5.   Add the dry ingredients to the large bowl and mix until just incorporated  

6.   With a spatula, fold in the chopped and crushed Oreos; then the chocolate chips.

7.   When ready to bake (these can actually be baked immediately) preheat the oven to 350 and bake for 8-10 minutes. (Bake time can vary depending on your oven. I knew they were ready when it was very slightly brown around the edge)


Tuesday, August 13, 2013

Funfetti Cake Batter Chocolate Chip Cookies


I have been ogling the notorious Sally's Baking Addiction funfetti Cookies for what seems like ages now. I knew it had to be the first cookie I made when I finally got back into the kitchen. It was SO worth it! You must make these. They are everything she describes them as on her blog. Chewy and soft but still crisp on the outside.

I tried baking them tall like she talks about, as well. I'm on the fence about the idea. I'm not sure if it is necessary for every cookie recipe, but  I think it's the best method for these. I tried baking them the normal way, and they were still great of course, but crispier and less chewy. I guess it is just a matter of preference, but I definitely want to try it a couple more times before I convert completely. They definitely aren't as pretty though, that's for sure. And it required a little more work. The cookies have to be reshaped/pushed into circles immediately after they get out of the oven, otherwise they look awkwardly oval. I might just have to take one for the team and experiment with this entire recipe all over again before I go back to school. Obviously for the sake of technique....not because I want more cookies...because I'm on a diet....


Funfetti Cake Batter Chocolate Chip Cookies 
adapted from Sally's Baking Addiction 

Ingredients
1 1/4 cup all purpose flour
1 1/4 cup yellow cake mix
1/2 teaspoon baking soda
1/4 teaspoon salt
1/2 cup granulated sugar
1/2 cup light brown
3/4 cup (1.5 sticks) unsalted butter, room temperature sugar
1 egg, room temp
1 and 1/2 teaspoons vanilla
1/2 cup white chocolate chips
1/2 cup semi-sweet chocolate chips
1/2 cup rainbow sprinkles

1. In a medium bowl, sift together the dry ingredients (first 6)

2. In the bowl of an electric mixer, cream together the butter and sugars until pale and fluffy

3. Add the egg and vanilla and mix on medium high for another minute until fluffy and creamy

4. Add the flour mixture and mix on LOW until just combined if using a stand mixer (can also be added in 3 increments to avoid mess)

5. Mix in the chocolate chips and sprinkles until just combined. don't over-mix! if you are afraid of over-mixing, fold in the chips and sprinkles

6. Cover with plastic wrap and refrigerate for at least an hour, but preferably for several or overnight.

7. When ready to bake, preheat the oven to 350 and shape the cookies dough balls by roll tablespoon sized balls and stack on on top of another so that they are tall instead of wide. This isn't a required step, but it's an interesting experiment that I suggest trying at least once. If they fall over during baking, that's ok. You can always push them back into circles when they come out of the oven. (but do it immediately if that is the case)

8. Bake for 11-13 minutes. They may not look like they are done, but they are. After the cookies have deflated a bit after baking, remove the tin foil or silpat from the cookie sheet so they the cookies can cool against the cold counter rather than continue to bake on the hot sheet.


Monday, February 6, 2012

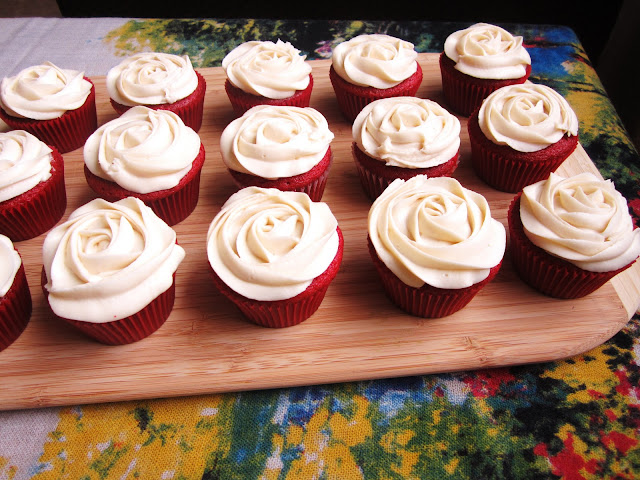
Red Velvet Cupcakes with Cream Cheese Frosting

Who doesn't love red velvet cupcakes? I feel like not liking red velvet is the same as not liking chocolate or cheese. It's just crazy! Red velvet is me and Courtney's favorite, so I decided to bake them for her birthday (and ultimately mine, which is three days later). Because I love them so much, that also makes me extremely picky. I tend to be picky about cupcakes in general though, so I was really hoping that this recipe would be the one. I've tried quite a few in the past and they just weren't exceptional. After I tried this one I will never use another recipe. These are unbelievable. They are perfectly moist and pretty simple to make too. They do require a lot of cream cheese, but that's literally the only flaw to these cupcakes. I seriously suggest giving them a try. I can guarantee you won't be disappointed!


Red Velvet Cupcakes with Cream Cheese Frosting

Filling  
This recipe is from Sweet Little Details

Ingredients 

1 8oz package cream cheese, softened
1 egg
1/3 cup sugar
1 ½ cups of white chocolate chips

Directions 
In a small bowl, blend the cream cheese, egg and sugar on medium speed until smooth. Then pour in the white chocolate chips and mix until combined. 


Red Velvet Cupcakes 
This cupcake recipe is from Bakerella 

Ingredients 
2 1/2 cups all purpose flour
2 cups sugar
1 Tablespoon cocoa
1 teaspoon salt
1 teaspoon baking soda
2 eggs
1 ½ cups vegetable oil
1 cup buttermilk
1 Tablespoon vinegar
1 teaspoon vanilla
1 oz. red food coloring

Directions 
Preheat the oven to 350. (Although I discovered that making the batter a day or so before and keeping it in the fridge made them even more moist and delicious. If you have to bake then right away, that is fine too, but I highly suggest preparing it ahead of time)

Whisk the eggs together in a medium bowl. Then add the rest of the liquid ingredients and beat until the oil and buttermilk no longer appear separated.


In a separate bowl, mix together the dry ingredients. Then add the wet ingredients to the dry ingredients and mix on medium high speed until completely combined.


Fill the cupcake liners to about 2/3 full. Top off with a heaping teaspoon of filling. (you can also do half the batter, the filling and then more filling on top if you prefer)

Bake for 20 - 25 minutes. Let the cupcakes cool completely before frosting.


Cream Cheese Frosting 
Ingredients 

2, 8oz. packages of Cream Cheese, room temperature (or microwave for 30 seconds)
1 stick of unsalted butter, room temperature
1 box of confectioners sugar (1 pound, about 2 and a half cups...I think...)
1 teaspoon vanilla extract

Blend all ingredients with an electric mixer until smooth.


Wednesday, August 17, 2011

White Chocolate French Macarons


You would think that after working at Sucre, I would never want to see another macaroon ever again. But the more I was around them, the more I wanted to try them out myself. I knew they would be difficult considering their delectable melt-in-mouth yet still light and rich all at the same time quality, but definitely not impossible. I mean I had the inside scoop while working in the kitchen, so I wasn't jumping in the pool without floaties if you know what I mean (segway for a sec - how uncomfortable do you think floaties are. I mean you have to float in the water with your arms up Jesus slash the kid with too many coats on from "A Christmas Story" style. that's no fun at all. I digress..). So anyway, I did a lot of reading about these lil guys before I got started and I think I did a pretty good job. I started off with one recipe though that I found on foodgawker no less and it just wasn't doin it for me so I kinda free styled just a little bit. Although there's not much free stylin you can do with a recipe that only has 4 ingredients. (Also, I would have made more colorful ones but I wanted to keep it simple for my first time. you know classy and romantic, as it should be.)


Ingredients
3 Eggs whites
3/4 cup and 2 tablespoons of almond flour
1 cup confectioners sugar
1/4 cup and 2 tablespoons granulated sugar

For the Filling
3/4 cup white chocolate chips
3/4 cup heavy whipping cream (follow the same instructions for the ganache I made for the car cake. sorry, don't feel like typin em ova again)

Directions
1. Beat the eggs whites in an electric mixer until soft peeks form.

2. Add the sugar and beat until firm peeks form in the meringue. You should be able to turn the bowl upside down without anything ploppin out. Be careful not to over or under beat though because the consistency of the meringue can either make or break your macaroons.

almost there....

3. In a separate bowl, mix and sift together the almond flour and the confectioners sugar. Discard whatever is leftover in the sifter (usually you have about a teaspoon left of almond bits - you want to get rid of those so your mac shells are nice and smooth)

4. gently fold in the dry ingredients into the meringue mixture. Do this in 3 or 4 increments. It should look like liquid hot magma. (austin powers? yes, no?...)

this is an example of what your dough should NOT look like (bold, underline, italics for emphasis). See how is a solid mass and not flowing nicely? If this happens, get another egg white and whip it on the side. Then add 2 tablespoons of sugar and make a little more meringue. Don't be discouraged if this happens. It is fixable. Don't waste that preciously expensive almond flour. Don't do it!

5. Pour the dough (hardly seems like dough but anyway) in a Ziploc bag (or pastry bag, I used Ziploc because I forgot where I hid my pastry bags) and cut the tip with a pair of scissors.

6. On a silpat or parchment paper (either works fine - I know, I did an experiment to see if there really was a difference. Martha thinks so. I say codswallop - real word. looks super odd spelled out...) Remember they spread out after the dollop so be sparing. I'd say about a tablespoon size is perfect.

7. This is the MOST IMPORTANT step. you MUST let them sit for at least 30 minutes to an hour before baking - hense why I didn't tell you to set the oven. If its on it beckons you to put those suckers in there but I say DON'T DO IT. Letting them sit out allows the macs to bake with proper "feet" which is the rough looking edge of the cookie. If you don't let them sit they will bake out or spreed out all gross like and turn hard.


8. When you can touch the uncooked macs without getting anything on your fingas and kinda bounce back I guess you could say, then they are ready to be baked. Set the oven for 280 degrees (I did 300 and it was too hot, they turned out darker than I had wanted them too) and bake for about 20 minutes. Check them regularly though. You can bake the same recipe a million times the exact same way and sometimes they just don't come out the same (I know this less from experience and more from my reading on the sub and so far its been true). Don't get discouraged. Even the best don't get it perfect every time. At the kitchen I saw an entire speed rack full of nasty cracked macs. Even the pros have bad days.


this is a perfect example of macs that didn't sit out long enough. I think another reason why they look like dog turd after its been stepped in is because they where too close to the bottom of the oven. This is one thing that all of the cook books and recipes decided to leave out. SO make sure that you are baking one tray at a time and also to make sure that it is located in the center of the oven. The goal is to cook all of the shells evenly (which means you might need to rotate half way through baking as well)


Thursday, July 7, 2011

White Chocolate Macadamia Nut Cookies


This recipe is definitely one of my new favorites. Other than palmiers (which I made the other day but was not impressed enough that I would bother blogging about it), white chocolate macadamia nut cookies are papa bear Bruno's favorite cookies. After having these, I almost have to agree with him. These cookies are both soft, melty and crunchy, giving them supreme dunkability. Milk and cookie harmony is an imperative quality for spending the night in my cookie castle (ergo my stomach), and these cookies d-d-definitely passed the test. 


Ingredients
2 sticks of unsalted butter, room temperature  
3/4 cup packed light brown sugar
1/2 cup white sugar (plus more for top of cookie)
2 eggs
1/2 teaspoon vanilla extract
1/2 teaspoon almond extract
2 1/2 cups all-purpose flour
1 teaspoon baking soda
1/2 teaspoon salt
1 cup crushed macadamia nuts
2 cups white chocolate chips

Nah da directions: preheat the oven to 350
1. Like almost every cookie recipe I know, begin by combining the butter and sugars until light and fluffy.

2. Then beat in the the eggs until a little smoother and fliffier.

3. Blend in the extracts

4. Combine dry ingredients in a separate bowl and then gradually add to the sugar/butter mixture (about 3 or 4 times) constantly scraping down the bowl between each adition.

5. If your nuts are still whole, pour them into a bag and crush them with a meat tenderizer. Then add the crushed macadamia nuts and chocolate chips to the dough and blend for about 5 seconds.

6. Cover a cookie sheet with tin foil and scoop the cookie dough (preferably with an small ice cream scooper with a release handle thing) into small balls. Try and make your scoops relatively small and far apart because the cookies spread out a good amount and tend to fall apart if they are too big.

7. Bake for 12 minutes. Emmediately after they have finished baking, sprinkle a pinch of sugar on top of each cookie.

inspired by this recipe