Sunday, September 25, 2011

Moist Banana Nut Bread

Who buys a bushel of perfectly ripe bananas? Courtney does. Hence they got extremely mushy and inedible very quickly. But no worries! These super mushy and actually juicily disgusting bananas are ideal for making a perfectly delicious banana bread. As gross as they seem past their prime, overripe bananas are actually sweeter than perfect yellow ones. So when they start looking more like a yellow dalmatian than a banana, bag those puppies up and let em sit on your counter until you can no longer bare the sight of them. (you absolutely have to bag them though. When I said "juicy" I wasn't exaggerating....they also sometimes attract fruit flies at this stage. which is fine for proteins sake...)


This recipe was adapted from a recipe I found on Cooks.com

Ingredients
1 stick of butter, room temperature
1 cup sugar
3 med. sized overripe bananas
2 eggs, separated
1 tsp. vanilla 
juice of half a lemon
1 tsp. baking soda
1 1/2 cups unbleached flour
2 tablespoons crushed walnuts

Directions
1. Butter a 9 x 5 x 3 inch loaf pan and preheat the oven to 350 degrees

2. With an electric mixer, cream the butter and sugar together.

3. Add the bananas, egg yolks, vanilla, lemon juice and baking soda.

4. Stir in flour with a spatula.

5. In a separate bowl, beat the egg whites with an electric mixer until very soft peaks form or until stiff. With a spatula, gently fold the egg whites into the rest of the banana mixture. (this is the trick to making your bread super moist rather than firm and dry)

6. Pour the mixture into the well greased pan and then sprinkle the crushed walnuts on top. Bake for 50 minutes, rotating the pan halfway through baking. Let cool on wire rack for about 5 to 10 minutes before serving. (mot recipes say cool completely but I couldn't resist, and I didn't taste a difference regardless)


For some reason this pictures look so much better on my computer.....I'm just an amateur photographer with a crappy camera though. I'm gonna take a class....eventually....the lighting is also terrible in my apartment. I tried going outside because natural lighting is always so much better but too many people walked by and I actually looked like a dumb ass - so I gave up

Friday, September 23, 2011

Crema Catalana or Crème brûlée? You Decide.

For my cultures of Spain and Latin America class (actually just Spain) we were given project in which we had to make a traditional Spanish food and present it to the class. I decided to make crema catalana because it was literally the only good Spanish food on the list (aaand I really wanted an excuse to use my torch.)

According to my research, there has been a decades old debate about whether the dessert originated in Spain or in France. The Spanish Crema Catalana and the French Crème brûlée are not exactly the same though. Traditionally, crema catalana has a little less cream or fat (which, in my opinion means not as good), but they are basically identical.

I used a recipe from a blog called Laylita's Kitchen. Her directions where perfect and really easy to follow so I don't want to waste your time pretending like I know what i'm talking about. So just follow the link! > The Link

Ingredients:
2 cups whole milk
1 cup cream
1 vanilla bean
4 strips orange peel (can also use lemon)
peel of a lemon
8 egg yolks
½ cup sugar
½ cup turbinado or raw sugar (sugar in the raw)
3 tbs corn starch

(to make 12, I actually doubled this recipe! so 16 egg yolks YIKES! still don't know what to do with all those egg whites....) 
Here are pictures of the process:


This is what happens when you put too much sugar on top of the custard. You need a thick enough layer for the sugar to actually make a nice shell, but there shouldn't be too much to the point where you cant see the custard beneath in un-torched sugar (does that make sense)


gross huh? this is what your crema catalana will look like if you caramelize the sugar too far in advance. The dessert should only be torched right before it is served. Although this still tasted good (according to the brave souls in our class that were willing to try it) It looks nasty and ultimately inedible. At least I didn't do all 12!

Tuesday, September 20, 2011

Lemon Almond Cookies


This past week I was diagnosed with strep, an infection and for a while mono and some type of liver syndrome. Fortunately I didn't have mono or the syndrome, but either way, last week was actually hell. So 3 prescriptions, 4 visits to the health center, getting my blood drawn (hate this hate this hate this) and 4 shots in my lower back later, and I am finally feeling better. Unlike I did  in high school, I never go to the health center anymore unless I'm actually dying. Last year I thought I would never have another nurse like the ones at The Hill. That place was like my home away from home. They really took care of me, even when I didn't really need to be taken care of. But I was truly proven wrong after this week. It may not be the Hill School Health Center, what with their oh-so-sweet demeanor, chocolate pudding, and actually perfect bagels, but its definitely a close second. So to say thank you to the one nurse in particular that really really took care of me everyday, I baked her some lemon almond sugar cookies and dropped them off to hopefully brighten her day.

My Cookie Instagram (love this app. I feel so artsy!)

According to Beverly, the amazing nurse that took care of me, so many college students (AND parents, actually especially parents) forget to simply say thank you. That made me so unbelievable disappointed considering how much these women really do for the sick students and people that filter out of there every day. So to the probably 5 people that read this blog, remember to just be appreciative! You have no idea how big of a difference a simple thank you can be.

These cookies are actually delicious though


Ingredients 
2 cups all-purpose flour
3/4 cup of almond flour
1 teaspoon baking soda
1/2 teaspoon baking powder
1/2 teaspoon salt
Zest of 2 large lemons
1 1/2 cups granulated sugar
1 cup unsalted butter, room temperature
1 large egg
1/2 teaspoon pure almond extract
4 tablespoons fresh lemon juice

Directions: 
Rather than pretend like this recipe is my own, just follow this link and the real creator will tell you how its done. The only thing I did differently was that I only rolled the cookies in sugar rather than sugar and more lemon zest. I thought they were zesty enough.
PS these cookies are MUCH better the day after or when they have become room temperature. Don't even bother tasting them right out of the oven because they aren't that great.


Sunday, September 18, 2011

Cinnamon Raisin Swirl Bread

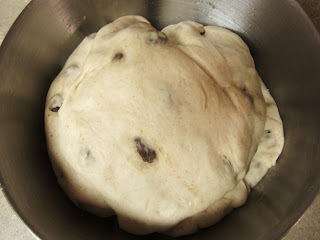
I have actually been dying to make cinnamon raisin swirl bread for quite some time now. I had just been putting it off and putting it off yadda yadda so FINALLY I made it. Sure it's good. But is it - get this loaf in my stomach now - good? probably not. But then again, it's like fancy toast, not like moist fudge-in-stuff bread (sounds good though, right?) Making bread is honestly one of the most satisfying things to make. Its a time consuming process but just watching the bread rise is so fulfilling. So I get amped about risen bread dough, so what? No honestly though its actually cool. It actually doubles in size! aaand if I don't eat it quickly enough, I can make homemade homemade french toast. I get to add that extra "homemade" cause I didn't purchase my bread via the bread isle. Well yes I did, but I didn't make french toast with it.

I used a recipe from my favorite baking cookbook "the Martha Stewart Baking Handbook" which my dad and step mom gave me for my 14th birthday. It was my first very own cookbook and I use it constantly. I basically trust every recipe in that cookbook (minus the strawberry buttercream. it like actually sucks don't make it.) So if you are gonna buy a cookbook about baking, Baking Handbook is the one. cause it's just so handy!


I actually have to change some things around though because cutting it in half kinda fudged the consistency a bit. So basically I could just take cred for this bad boy but no one would believe that I pulled a recipe like this out of thin air so.....

 Ingredients 
FOR THE DOUGH 
 (note I cut the recipe in half because I only had one loaf pan and also zero need for two loaves of cinnamon raisin bread)
2 teaspoons active dry yeast (which is a half a packet - this took some time to figure out...)
1 cup warm milk (I did I minute but its a mixed bag really)
4 cups all purpose flour
4 tablespoons of unsalted butter 
1/4 cup sugar
1 large egg
1 1/4 teaspoon salt 
3/4 cup raisins (Martha say's less but I couldn't resist) 
1/2 tablespoon ground cinnamon 
vegetable oil to grease the bowl and plastic wrap (or if your ghetto like me a large plastic bag because I keep forgetting to get plastic wrap at the grocery store)

FOR THE FILLING:
3/4 cup sugar
1 egg ( I would say a half but that's so just use what you need and ditch the rest) 


Directions
1. the dough: whisk the warm milk and the yeast together in a large bowl. Then add all of the other dough ingredients and blend with an electric mixture until all of the ingredients look well combined (about 3 minutes) and then continue to blend until the dough forms a uniform ball (or something like it) so about 6 or so minutes more - I realized that using a hand held mixer for this actually sucks. It just isn't the same. Unfortunately I don't have 400 hunded plus to blow on a swanky kitchenaid though so I just had to make do!

2. Place the dough on a lightly floured work surface and gradually need in the raisins and cinnamon until they are combined and well distributed. Place the dough ball into a greased bowl and cover with greased plastic wrap (or, in my case, a plastic bag) and leave in a warm place for about an hour. THIS IS WHERE IT DOUBLES IN SIZE. so exciting. my favorite part. (I like the microwave, if it hasn't been used recently. probably cause papa bear bruns puts it there)

3. This part I'm just gonna tell you exactly what Martha says, cause I have no idea if I actually did this part correctly...."Return the dough to a lightly floured work surface, and pat into a round. Fold in the following manner: Fold the bottom third of the dough up, the top third down, and the right and left sides over, tapping the dough after each fold to release excess flour, and pressing down to seal. Return the dough to the bowl, seam side down."

aight back to the reel cook...
before the rise
4. Return the dough to that flour work area (which I have actually yet to clean. sorry Courtney) and roll it out into a large rectangle. (i'm not gonna get into measurements cause honestly, who's counting?) Fold 2 sides of the rectangle about an inch deep. Cover the dough with a light layer of the egg wash (I didn't have a pastry brush so guess what? I used my hand) Then sprankle the cinnamon sugar blend all over.

after the rise
5. Roll the dough into a log and press in the sides so that it fits nicely into your loaf pan, making to to liberally cover the pan in vegetable oil so the loaf actually comes out once it has been baked! (mines sooo crappy. its an investment clearly and I didn't make it.)

6. Then let it rise again! (and don't forget to cover it in plastic) During this time you can begin to preheat your oven to 425.

 7. FINALLY you can pop that sucker in the oven and let it bake for 20 minutes. Then loosely cover it in tin foil and rotate the pan so it bakes evenly and the top doesn't burn.
After the bake


8. When the bread is finished let it sit for a while before slicing in. (but apparently you don't have to wait for this particular bread. however I've been told to never do that with bread so I decided to wait it out)


could I have given you any more angles? yes, I actually could have.

Saturday, September 17, 2011

Chewy Sugar Cookies


So last year I fell in love with the sugar cookies at the Colonnades Dining Hall at Elon. I actually couldn't leave without taking at least two, maybe three of them every time they caught my eye. Looks like they changed their recipe or something (which could also be due to the fact that Courtney and I don't eat dinner there every night like we used too as a result of the influx of freshman, new colonnades residents and don't forget, new kitchen) but they don't have them anymore! Imagine my heartbreak. I did my research though (actually not really, allrecipes.com is genuinely pretty reliable. especially if a particular recipe has been reviewed 490 times). These cookies are like slice-n-bake combined with colonnades good. I put them spranks on there (not usually my style) to make them look just like the ones I used to eat from nades. Deliciously chewy on the inside and crisp on the outside. AND they taste better the next day. Not all cookies are as multi-talented....