Tuesday, July 24, 2012

Homemade Ice Cream Sandwiches


Ever since I got my ice cream maker, I've kind of been obsessed. I've only done two blog posts so far, but I can't tell you how many times I've already used this thing. Once you fail (which you will, unless you are some kind of ice cream savant), especially a couple of times, you become obsessed with perfection. I think I finally found a fool proof, go-to base recipe that I will probably use for most of my ice creams though, so I can't start experimenting. 

When I worked at the confection studio at Sucre, I noticed we never used egg yolks. But after doing a ton of research on the web, I couldn't really find any recipes that didn't start with some form of custard (which means using egg yolks to thicken the milk, almost like making lemon curd or the filling of a berry tart if you have ever done that...) Well doing this is extremely temperamental and can go wrong at a number of different stages in the process. And the worst part about that is, many times you don't exactly know where you went wrong. Did I curdle the milk? Did I not whip the egg yolks enough with the sugar before adding it to the milk? Was my flame too hot or too low? There is so much going on at once, and so many things that could go wrong, I really needed something a bit more foolproof (heavy cream doesn't grow on trees you know...).

On a random slowish afternoon at work, my lord and saviors walked through the double glass doors dressed as a thin, hipter-ish, middle aged man and his wife. The ones that kind of remind you of your old music teachers and almost always leave a tip (people from the city - and definitely my people working at the uptown sucre know exactly what kind of people i'm talking about. Actually I bet people from certain parts of new york know what i'm talking about too...but I digress...). We started chatting about our amazing gelato and how it doesn't have eggs etc. He also turned out to be a dabbler in the homemade ice cream world as well and he suggested I try Jenni's best ice cream base, which uses cream cheese instead of eggs and a timer rather than candy thermometer (thus excluding the two things I dread about making homemade ice cream).

Obviously I went home and bought the cookbook right away. Of course I will continue to try the traditional custard based ice creams, but for now, HOLY COW this stuff is incredible! Its creamy, rich, and pretty much fool proof. You can even trade out the 3 tbs of cream cheese for marscarpone...which obviously I will be doing very very soon.... 


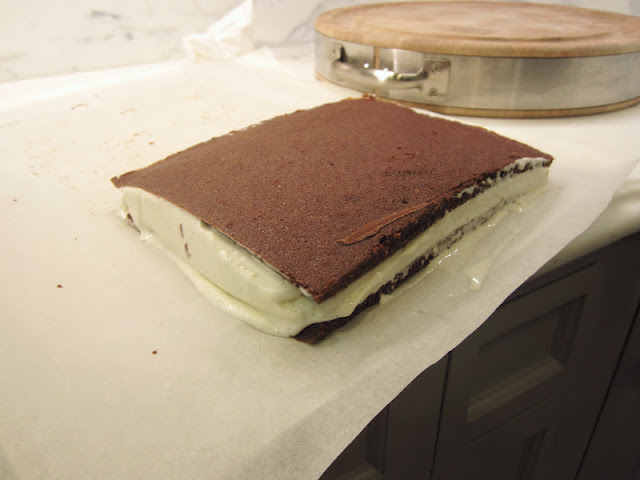
Homemade ice Cream Sandwiches, made with Jeni's Best Vanilla Bean Ice Cream

The "Cake-y Sandwich Part" Recipe 
which I found on this website

Ingredients 
½ cup unsalted butter, melted
½ cup granulated sugar
1 large egg
1 teaspoon vanilla extract
½ cup all purpose flour
¼ cup unsweetened cocoa powder
¼ teaspoon salt

10 x 15 inch (25 x 38 cm) rimmed baking sheet
Parchment paper

Directions
Preheat your oven to 350. In a medium sized bowl, whisk together the melted butter and sugar. 


Then whisk in the egg and vanilla. 


Then add the flour, cocoa powder and salt and mix until incorporated. (since there is no leavening agent, you can't over-mix it - refreshing, huh?) 


In you parchment lined baking sheet, pour in the batter and spread out a thin layer using a offset spatula. - If you don't have one, get one. They are super cheap and come in handy for a million different things. 

Bake for 10 minutes, rotating half way through to ensure even baking. It should be done when the cake is no longer shiny and it has begun to separate from the paper along the edges. 


Let it cool completely and then remove the parchment from the pan to cool even more. If you don't your ice cream will melt and both will be ruined! 


Vanilla Bean Ice Cream 
Ingredients
2 cups milk
4 tsp. cornstarch
1 ¼  cups heavy cream
2/3 cup sugar
2 tbsp. light corn syrup
¼ tsp. kosher salt
3 tbsp. cream cheese, softened
1 vanilla Bean, both seeds and pod, separated 

Directions
Before you start cooking, set up your stations:

(a.) In one small bowl, wisk together 1/4 cup of milk and the cornstarch

(b.) Place the 3 tablespoons of cream cheese in a bowl and set aside.

(c.) Open plastic bag with edges folded over set over a large bowl filled with ice (the ice should melt a bit during the cooking. you can add a bit of water to it later if it isn't ice bath ready by the time you are ready to cool your ice cream)

(d.) In a 4-quart sauce pan (at least - believe me I made this mistake and it was a hassle trying to switch pots in the middle of everything...pictures to follow...) Add the remaining milk, heavy cream, sugar, salt and vanilla bean and wisk together until somewhat incorporated (it should turn a very faint green - the color shows up more during the cooking process)

(e.) 4 minute timer ready to go


NOW you can start cooking (and this is actually the quick part)

1. Over medium high heat, cook the mixture until it comes to a rolling boil. Boil for exactly 4 minutes.

2. Pour in the cornstarch slurry and mix well. Bring back to a boil and cook for 2 more minutes then remove from heat. Remove the vanilla bean.

3. With your small measuring cup, scoop out about 1/4 cup or more of the hot mixture and pour into the cream cheese bowl. Mix very well and then pour it back into the main pot. Stir well until thick.

4. Pour the hot cream into the plastic bag over the ice bath. Let sit for at least 30 minutes or until completely cold. If you don't want to freeze right away, you can also put the plastic bag in your fridge for up to 3 days.

5. Freeze according to your ice cream makers instructions (I do it for about 25 minutes)


Yeah you know you want a bite....


Sunday, July 22, 2012

Whole Foods Chantilly Cake


My lovely sister, Melanie, was home for about two weeks over 4th of July week (weird how it wasn't week-end). We also got to celebrate her birthday too, which she apparently hadn't celebrated at home for about 6 years. Since I went to boarding school and then to college, I know exactly how that feels, it I knew it was special that she got to finally celebrate at home with her family. Since I almost always bake something when I go to my grandmother's house and it was also Mel's b-day, I thought this would be the perfect time to bake a cake.

There is no comparison to the Whole Foods Chantilly cake. It is simply fantastic. Sold by the heavenly slice, this cake is exceptionally moist and the most incredible frosting. So naturally, my instinct was to try and make it myself. And I must say, it came out pretty damn good. The cake wasn't as moist, but I'll probably play around with that recipe a bit more before it's perfected. The Chantilly cream frosting however was sensational. I mean, anything with both cream cheese, whipped cream, AND mascarpone has got to be amazing (which it was).

.....I also admit being lazy when I took these pics, and thus I really don't think they do the cake justice. It was delicious and I definitely will be making it again. Maybe I'll have a DSLR camera and I'll finally get accepted onto foodgawker....(yeah right) but a nerd can dream, right? 


Whole Foods Chantilly Cake 
What you will need: 
Simple yellow cake recipe (I used THIS ONE)
Chantilly cream frosting
Macerated strawberry/raspberry puree  
Apricot fruit glaze (or just thinned and microwaved apricot jam)
strawberries 
blackberries
raspberries 
blueberries 
strawberries 

Chantilly Cream Ingredients
8 oz container cream cheese, room temp
8 oz container mascarpone cream cheese, room temp
1 cup confectioners sugar
2 cups heavy whipping cream
1 teaspoon almond extract

Berry Sauce
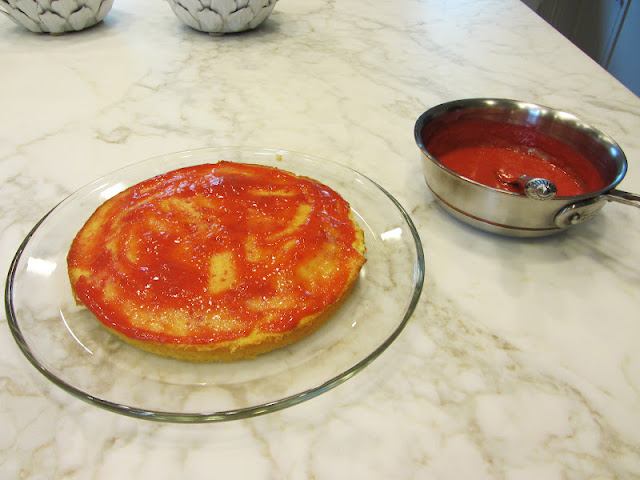
Blend together strawberries and raspberries (or just raspberries. I didn't have enough so put strawberries in there too).  In a small sauce pan over medium low heat, add the berry puree and 1/4 cup of sugar. Let this sit for about 5 or so minutes until you think the sugar has disolved into the puree.

Directions
1. Whip the cream cheese, mascarpone and confectioners sugar together until light and fluffy.


2. In a separate bowl, whip together the heavy whipping cream and almond extract until stiff peaks form. Make sure not to over mix because it will become grainy and change the texture and appearance of your frosting. 


3. Gently fold the whipped cream into the mascarpone cream cheese mixture until fully incorporated.

 The next steps I show you how to assemble the cake. I think the pictures are pretty self explanatory. Read the captions for more details about each pic


Let the sauce sit and soak in for a bit. I think this adds a bit of extra moisture to the cake
Spread a generous layer of the frosting on top of the sauce. With the spatula, make the outer rim of the frosting higher than the center so the fruit and sauce stay in the center of the cake rather than spill out the sides when you add the top layer of cake.
This is the crumb coat before the second coat of frosting. This is crucial for a smooth finish on your cake. The key is to not let the spatula touch the cake during round 2 of frosting. (for the crumb coat, you do)
Now the fun part - arrange your fruit! I cut the kiwi's in half. I also started with the biggest, aka the strawberries, and gradually worked my way down to the smallest (the blueberries)
Mel tryin to sneak a taste before we dig in. No one wanted to sing. LAME


Slice...
Serve!

Saturday, July 21, 2012

Crabby Crab Cakes


Last summer my mom and I would cook a home cooked meal of my choice every thursday when my step dad was across the lake at his private practice. This summer we decided it would make more sense to cook on Wednesday, the night before Jon is away, so he could actually eat with us. Regardless of the day of the week, this is probably one of my favorite things to do over the summer. My mom and I really get to spend time together, while she can teach me knew things at the same time. Hands down, my mom taught me how to cook. She trusted me in the kitchen at a really young age, and I can't thank her enough for that. She let me bake box cakes and cookies from her warn down recipe collection. She even let me cook the family dinner a couple of times. I just loved serving people, and of course I still do. I think that is why I am so attracted the the culinary industry. I just don't know if I have the balls.... 

Also - sorry it has taken me so long to post this! I misplaced my camera for like two weeks and I had at least 3 blog posts still saved on there that I hadn't uploaded to my computer. I was having palpitations to say the least.... 

Click "read more" for more pictures and the recipe!


Crab Cakes 
This recipe is mildly adapted from Paula Dean

Ingredients 

1 pound crab meat (warning $$$)
½ cup crushed Ritz crackers
3 green onions (green and white parts), finely chopped
½ cup finely chopped red bell pepper (about half a pepper)
¼ cup mayonnaise
1 egg
1 teaspoon Worcestershire sauce
1 teaspoon dry mustard
½ lemon, juiced
¼ teaspoon garlic powder
1 teaspoon salt
Pinch of cayenne pepper
All-purpose flour, for dusting
½ cup peanut oil

*Tartar Sauce 

Directions
Mix all of the ingredients together in a bowl, excluding the flour and peanut oil. 


Lightly flour one large plate and somewhat heavily flour a small plate. With your hands, scoop about a palm size of the crab mixture, flatten it lightly with your palms, and then place it on the small plate with the flour. Scoop a generous pinch of the flour and pat it on top of the cake until it is nicely covered and just comes together. Then place the cake on the large, lightly floured plate. 

**Your hands will get really sticky very quickly so I suggest rinsing off your hands in the sink after every crab cake has been shaped. Otherwise you wont be able to form them well and nothing will stick together (other than to your hands). 

When all of the cakes have been shaped, refrigerate for at least an hour. (*optional)


Pour your oil into a cast iron skillet and heat over medium to medium low heat. When you oil is hot, gently place about four cakes in the skillet at a time. Cook on each side for about 2 and a half minutes. (depending on the temp of your oil, it may take a little longer. We started with the oil being too hot, so it didn't take too long for each side to cook) 


Tartar Sauce 
Recipe adapted from a clipping out of an old Martha Stewart Living magazine. This recipe also reminded me that I don't like capers. They're classy, I know - and my mom and step dad thought it was a nice touch, but I could easily do without. 

ingredients adapted from a recipe I found in an old issue of Martha Stewart Living

Ingredients 
1 cup mayonnaise
3 1/2 tablespoons sweet relish
1 tablespoon and 1 teaspoon fresh lemon juice
1 tablespoon drained capers (I would exclude this all together. and the original recipe even called for 3 tbls....)
3 tablespoons freshly chopped tarragon
1 teaspoon course salt
1/4 teaspoon pepper

Directions - mix together in a bowl and voila!


Tuesday, July 10, 2012

Prickly Pear Cactus Sorbet


After failing my first attempt at making sorbet, I thought I would use the method I learned during my internship at the Sucre confection studio. My first sorbet, although smooth at first, turned into a solid icy mess after it had settled in the freezer for several hours. Liquid glucose supposedly acts like alcohol
This recipe was incredibly easy. I can't get over it. It's still creamy like ice cream, but it doesn't require all the eggs and tempering and hoopla that goes along with it. The coconut milk gives it the nice creamy texture and a faint taste of piƱa colada, which I'm pretty positive is going to be the next sorbet flavor I whip up (virgin of course). 


Prickly Pear Cactus Sorbet 
Ingredients 
1 13.5 ounce can of coconut milk
3/4 cup prickly pear syrup
1 1/2 tablespoon lime juice
2 pinches of salt
1 tablespoon liquid glucose


Directions
1. In a medium sized bowl, whisk together the coconut milk, syrup, salt and lime juice.

2. In a small, microwave safe bowl, drop the tablespoon of liquid glucose and pour 1/4 cup of the pear and coconut mixture on top. Don't both trying to mix it at this point.
***in order to successfully work with the glucose, plunge the tablespoon into an ice bath first before attempting to scoop it out from the container. Then stick your hand in the ice bath until very very cold, and scrape the glucose off of the tablespoon and into the microwave safe bowl. Unless you want that glucose to stick to you for hours, you absolutely must not skip the ice bath step.

3.  Microwave the glucose and 1/4 cup of the mixture for about 15-30 seconds. After it has warmed, whisk the mixture together so the glucose is emulsified into the base. (I actually learned how to do this during my internship, which was pretty cool. I got the inside scoop....get it?!) Then pour the mixture back into the medium bowl and mix well.

4. Before freezing, refrigerate the mixture in an airtight container until cold (aprox. 1-2 hours)

kinda looks like pepto bismol, huh? But don't worry, it tastes A LOT better