Sunday, August 28, 2011

NY Times Chocolate Chip Cookies


According to the New York Times as well as countless posts on food gawker, this is apparently the best chocolate chip cookie recipe out there. Not gonna lie, they are definitely delicious. I don't think I like them more than the Neiman Marcus cookies, but they are less effort (and not to mention much cheaper to make - ergo you don't need a coffee grinder, oatmeal or two 8 ounce bars of chocolate. Believe be, it adds up).  The only flaw is that you have to wait at least 24 hours before you bake them. Can you imagine the anticipation? I've been waiting a long time for the perfect occasion to make them and this weekend was the perfect opportunity. Since I got here a few days before my roommate, I made the dough the day before Courtney and her family got here so I had an excuse to not bake them right away.


So I literally copy and pasted the recipe from this blog called One Lovely Life which I found via foodgawker. Don't be mad One Lovely Life! I'll put it in quotations. gotta keep it MLA style (minus the citation cause that's too much effort) - I am still in college...Although she said it was adapted from the original.. I looked at the original. Still haven't found the adapted part....oh well!

"Ingredients:
2 1/2 sticks (1 1/4c) butter, softened
1 1/4c brown sugar
1c sugar
2 eggs
2 tsp vanilla
1 3/4tsp salt
1 1/2tsp baking powder
1 1/4tsp baking soda
2c minus 2 Tbsp cake flour
1 2/3c bread flour
20oz (3 1/3c) semi-sweet chocolate chips

Directions:
1. In a large bowl, cream butter and sugars until light and fluffy (about 4-5 minutes). Beat in eggs, one at a time until well incorporated. Stir in vanilla.

2. Sift in salt, baking powder, baking soda, cake flour, and bread flour. Stir until dry ingredients are well incorporated. Fold in chocolate chips.

3. Press plastic wrap against the surface of the dough and refrigerate dough at least 24 hours (dough can remain refrigerated up to 72 hours).

4. When ready to bake cookies, scoop golfball-sized balls of dough onto a cookie sheet lined with parchment or a silicone mat. Bake 6 cookies at a time at 350 degrees for 10-11 minutes, or until edges are golden but centers are still slightly gooey. Allow cookies to rest on the warm baking sheet about 5 minutes before moving to a cooling rack (this will allow the heat from the pan to finish cooking the centers).

Makes about 3 dozen cookies."

 Yes, I am posting on my food blog and watching the vma's alone while my roommate goes out and has a good time. But it's a sunday and I am le tired, aight? My wild side will come out. you'll see.... Bella and I also discovered tonight after we decided we were too lazy to go out that my pajama shorts have quite a few tears on the back exposing a large portion of my left cheek. Why I didn't feel a draft i'll never know. However it does explain why the boy in the elevator gave me that funny look when I was walking back to my apartment. your welcome hun. These shows aren't always free. And if you were wondering, no I am not throwing them away. far too soft for that.

Friday, August 26, 2011

Blueberry Muffins

So it's officially my first week in our new apartment - our being myself and Courtney Cooper, the girl in basically all of  my recent facebook pictures (something we decided to improve upon this upcoming year). The apartment is so nice and the kitchen is amazing. I wanted to make something for Courtney and her family before they got here so I made cookies and muffins (I had a lot of free time after my two days full of moving). I wanted to made bread also but harry tits (aka Harris Teeter) was out of active dry yeast. lame.

Anyway, I wasn't very creative with this recipe because I don't consider myself a muffin expert (apart from my muffin top leftover from this summer slash middle school) so I just used a recipe from good ole allrecipes.com that I altered a lil bit. I mean 5,013 people said it was good so why bother trying to drastically change it, right? They were really good and I would probably make them again, but as embarrassed as I am to say it... the Colonnades dining hall at Elon makes them better (when they are warm and fresh that is). I'm pretty sure they cheat and they can't really be compared but i'm pretty tight with them dining hall ladies so maybe I can get the inside scoop on their recipe. I think this is the first time since like lower school that I have gotten to know the dining hall ladies better than the ones health center at boarding school. I practically lived at the Health Center. Those women were like my second family. I went so much my sickness folder was almost as thick as Caroline Moxley's (I'm just kidding Caroline I have no idea how thick your folder was).But Sue and I have developed a friendship at Collonades (she's the sweet old lady missing a lot of teeth?) . We share a common name. It's a quirky kind of friendship.

I also just realized how much I like using parenthesis. I'm assuming it's because i'm not a swell writer and I have trouble staying on one topic at a time. Sorry bout it (p.s. we hate that expression. it makes no sense).

Wednesday, August 17, 2011

White Chocolate French Macarons


You would think that after working at Sucre, I would never want to see another macaroon ever again. But the more I was around them, the more I wanted to try them out myself. I knew they would be difficult considering their delectable melt-in-mouth yet still light and rich all at the same time quality, but definitely not impossible. I mean I had the inside scoop while working in the kitchen, so I wasn't jumping in the pool without floaties if you know what I mean (segway for a sec - how uncomfortable do you think floaties are. I mean you have to float in the water with your arms up Jesus slash the kid with too many coats on from "A Christmas Story" style. that's no fun at all. I digress..). So anyway, I did a lot of reading about these lil guys before I got started and I think I did a pretty good job. I started off with one recipe though that I found on foodgawker no less and it just wasn't doin it for me so I kinda free styled just a little bit. Although there's not much free stylin you can do with a recipe that only has 4 ingredients. (Also, I would have made more colorful ones but I wanted to keep it simple for my first time. you know classy and romantic, as it should be.)


Ingredients
3 Eggs whites
3/4 cup and 2 tablespoons of almond flour
1 cup confectioners sugar
1/4 cup and 2 tablespoons granulated sugar

For the Filling
3/4 cup white chocolate chips
3/4 cup heavy whipping cream (follow the same instructions for the ganache I made for the car cake. sorry, don't feel like typin em ova again)

Directions
1. Beat the eggs whites in an electric mixer until soft peeks form.

2. Add the sugar and beat until firm peeks form in the meringue. You should be able to turn the bowl upside down without anything ploppin out. Be careful not to over or under beat though because the consistency of the meringue can either make or break your macaroons.

almost there....

3. In a separate bowl, mix and sift together the almond flour and the confectioners sugar. Discard whatever is leftover in the sifter (usually you have about a teaspoon left of almond bits - you want to get rid of those so your mac shells are nice and smooth)

4. gently fold in the dry ingredients into the meringue mixture. Do this in 3 or 4 increments. It should look like liquid hot magma. (austin powers? yes, no?...)

this is an example of what your dough should NOT look like (bold, underline, italics for emphasis). See how is a solid mass and not flowing nicely? If this happens, get another egg white and whip it on the side. Then add 2 tablespoons of sugar and make a little more meringue. Don't be discouraged if this happens. It is fixable. Don't waste that preciously expensive almond flour. Don't do it!

5. Pour the dough (hardly seems like dough but anyway) in a Ziploc bag (or pastry bag, I used Ziploc because I forgot where I hid my pastry bags) and cut the tip with a pair of scissors.

6. On a silpat or parchment paper (either works fine - I know, I did an experiment to see if there really was a difference. Martha thinks so. I say codswallop - real word. looks super odd spelled out...) Remember they spread out after the dollop so be sparing. I'd say about a tablespoon size is perfect.

7. This is the MOST IMPORTANT step. you MUST let them sit for at least 30 minutes to an hour before baking - hense why I didn't tell you to set the oven. If its on it beckons you to put those suckers in there but I say DON'T DO IT. Letting them sit out allows the macs to bake with proper "feet" which is the rough looking edge of the cookie. If you don't let them sit they will bake out or spreed out all gross like and turn hard.


8. When you can touch the uncooked macs without getting anything on your fingas and kinda bounce back I guess you could say, then they are ready to be baked. Set the oven for 280 degrees (I did 300 and it was too hot, they turned out darker than I had wanted them too) and bake for about 20 minutes. Check them regularly though. You can bake the same recipe a million times the exact same way and sometimes they just don't come out the same (I know this less from experience and more from my reading on the sub and so far its been true). Don't get discouraged. Even the best don't get it perfect every time. At the kitchen I saw an entire speed rack full of nasty cracked macs. Even the pros have bad days.


this is a perfect example of macs that didn't sit out long enough. I think another reason why they look like dog turd after its been stepped in is because they where too close to the bottom of the oven. This is one thing that all of the cook books and recipes decided to leave out. SO make sure that you are baking one tray at a time and also to make sure that it is located in the center of the oven. The goal is to cook all of the shells evenly (which means you might need to rotate half way through baking as well)


Saturday, August 13, 2011

My New Audi A4 - in cake form!


My dad got me a new car this summer (I know I almost peed a little I was so excited) and to say thank you, I thought I would give him a car too. I have always wanted to use fondant before, but I've been pretty intimidated by it. I thought it would be really difficult and too advanced for my inexperienced...ness. I'm not gonna lie, this is the most time consuming kitchen project I have ever done, but it is so satisfying that I would absolutely do it again. (although its redunculously expensive too - the fondant alone was over 20 dorra. no I didn't make it myself. even the big deal bakers don't make their own though. I know sucre doesn't...big deal) Anyhoo, I also had to bake 3 cakes which has 8 egg yolks in each cake. yeah that an s*-ton of eggs. I plan to make some macaroons tomorrow though with the leftover whites so we'll see how that goes.


For the cake I used a classic yellow cake recipe I found on the inter-web which you can find here. This particular project was more about the look of the cake than the actual taste. I basically wanted to see if I could actually pull it off so I didn't want to get to wild with flavors. I also wanted to do a yellow cake because my car is black with a beige interior (so I want to make a black car cake, with a yellow interior with a chocolate ganache between each layer. I know, I'm realllly clever)

I used two large rectangular pans and two medium rectangular pans (with 3 recipes of the classic yellow cake)


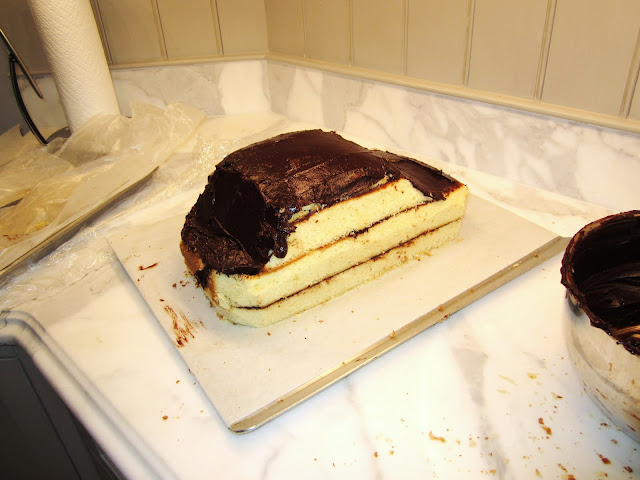
After I carved the cake, I covered it in chocolate ganache so the fondant would stick to the cake
I made a small batch of simple buttercream for the piping(and don't tell steph, but I don't know how I feel about them candle holders. their pretty intense...)
You would think that cutting into the cake you spent several days to make would be heartbreaking, but I actually loved it...Also I didn't realize how big of a cake this actually is. It could easily serve about 20 or more people. There were 3 of us....
Because it took me several days to make this cake (because I work too much and never have time to do anything these days) the cake itself was dryer than when it was first baked. Therefiz I decided to add a dollop of buttercream on the side with some fresh blueberries. I think it make a huge difference.


Saturday, August 6, 2011

Southern Candied Pecans


Before I started working at Sucré, I would have laughed out loud - yes lolled - if you told me my next new obsession would be pecans. I have never liked pecans. Actually never. Every year when my stepmom made pecan pie for thanksgiving, I would only eat the crust and the goowy stuff - everything but the pecans. Just one of these pecans and I was hooked. Thanks my internship, I luckily got to learn the secret behind this decadent sugar-coated crack. The funny thing is, all of the ingredients are written directly on the can we sell in the store - and it doesn't take a rocket scientists to kind of figure out the rest. Because the ingredients are literally written on the label, I think it would be fair if I posted them here. It takes a little time and work though. So if you don't feel like getting your hands dirty, I highly suggest you stop by the store on Magazine or Lakeside (pref magazine, cause that's where ma gurls at) or order them online (yeah they do that too) cliggity click it to see what i'm talking about.


Ingredients 
a lot of Granulated Sugar
Simple Syrup (Equal parts water and sugar dissolved via the microwave or stovetop)
1/3 cup sugar 1/3 cup water 
about 3 tablespoons Praline Liquor
about 2 teaspoons of Salt  
Bag of Pecans (16 ounces)

Directions fo da confections

first dip in the pool
1. Preheat the oven to 300. Toss of the the ingredients (but only using half of the simple syrup mixture) together until well coated and spread on a sheet of parchment paper. Bake for 20 minutes.


2. Remove the pecans from the oven and let cool completely.

3. Repeat step one with the same amount of ingredients. Make sure the pecans are liberally coated in sugar. Increase the oven temp to 325. Sprinkle even more sugar on top right before placing them back into the oven. Bake for another 25 minutes, tossing the pecans around once or twice during the baking process to make sure they bake evenly.

Second dip in the pool


*warning* don't eat them until they are cool! you will regret this I promise. one because they are blazin hot and two they don't get crunchy until they have had time to dry out.

4. Let the pecans sit out for at least an hour. They are best stored in a tin container or something that can be sealed properly.

To show my appreciation for this super special treat, I decided to show you a variety of glamor shots of them in all of their pecany glory.